Did you know you can get a free organizing printable set just by subscribing to the blog via e-mail? Get the details here.
?I recently realized that several of you aren?t on Pinterest yet, or you have signed up for an account but you?re not really sure what you?re doing yet. I?m here to help show you how to use Pinterest for beginners.
If you?re a more experienced Pinterest user, pay special attention to steps 6 and 7. You might find a couple useful trips and tricks as well, and feel free to leave your advice in the comments. You can follow me on Pinterest here (and leave a link to your Pinterest in the comments).

I created a video to go along with the tutorial. They basically say the same thing, but I know some of you like to see in video rather than just read the words:
Decide if Pinterest is Right for You (Step 1)
First things first, if you?re a total newbie, you need to decide if you even want to use this Pinterest thing everybody keeps talking about. I?m willing to bet the last you need is some other social media thing to consume even more of your time. I?m right there with you. So, what?s the purpose of Pinterest? How can it help you?
There?s really three main ways to use Pinterest:
- You can use it as your own virtual, super organized bulletin board to store recipes, craft ideas, home improvement ideas, and really any visual idea that you want to reference later. What do you do when you run across an online recipe you want to try? Pin it so you can come back to it later. What if you?re shopping for new desks for your office? Pin all the ones you like so you can look at them all together and come back to them later. I think you get the idea.
- You can use it as a source to find new ideas. As a Pinterest user, you?ll be able to see what other people (the people you follow) pin. This can really help you discover things you never would have found on your own (my DIY magnetic bulletin board is one example). Also, you can search Pinterest to find ideas such as a cherry chocolate cake recipe or craft room ideas.
- You can use it to share great content with your followers. Any of your followers get to see what you pin, so it?s a great way to share things you like.
Sign up for a Pinterest Account (Step 2)
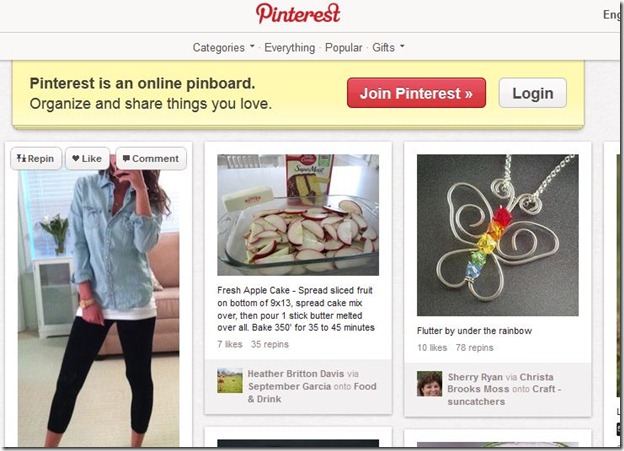
This is pretty self-explanatory. Go to www.Pinterest.com and click ?Join Pinterest.? You can join using your e-mail address, Facebook, or Twitter. (I do recommend linking to Facebook so you can find your friends easily. It will not just automatically post to your wall, unless you tell it to.) They will walk you through finding someone to follow, creating you first boards, and installing a button. I?m going through the rest of the tutorial pretending you have already done that.
?
Follow People with Similar Interests (Step 3)
Now that you have an account you?ll want to start following some people or boards. Following someone? just means that on your main Pinterest page you will see what they pin. The screen when you first login is showing you all the pins (in chronological order from most recent to oldest) of everyone you follow.
To start, I followed my personal friends from Facebook. In order to do that, hover over your name in the upper right hand corner and click on ?Find Friends.?
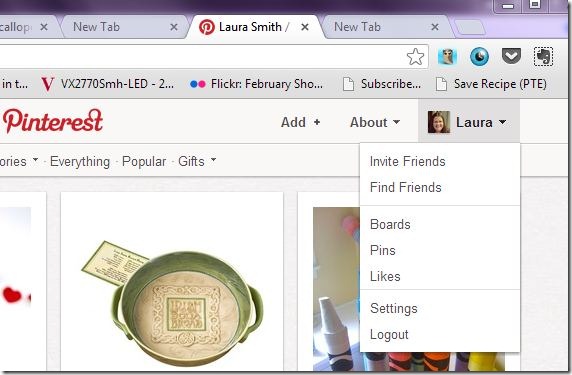
From there you can easily follow people from Facebook or Gmail. Also, when you?re reading blogs that you love look for the bloggers Pinterest button to follow them.
Create your Pin Boards (Step 4)
I?m going to show you how to create new boards, but keep in mind you can also do this on the fly as you are pinning things. Next week, I?m going to do an entire in depth post on how to organize your pin boards, which is super important. Think of your boards as an actual physical bulletin board, so you can keep all your pins organized by category. If you?re just starting out, just keep it really simple and broad. I would start with something like Dessert Recipes, Main Dish Recipes, Home Improvement, Fashion, and anything else you really love and know you?ll be pinning a lot of. To create a new board, just go to your name in the upper right, hover over it, and choose ?boards? from the drop down. Scroll down to the bottom and you?ll see this:
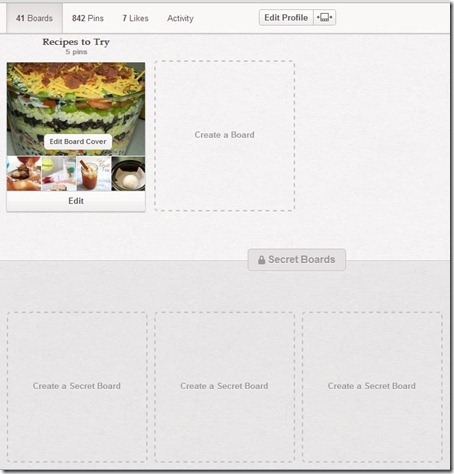
Just click on create a board ? pretty straightforward. You?ll notice at the bottom you have an option for up to 3 secret boards. You can have as many regular boards as you want (some people have tons), but only 3 secret ones. Secret boards mean that nobody can see them or your pins to them. They are for your eyes only. Anybody can see your regular your boards and your pins to them. It?s also a good time to mention that anybody can follow you, and you don?t have to give them permission to do so. (It?s not like Facebook.) Anything you pin on your regular boards is completely public.
Start Exploring your Main Page and Repinning (Step 5)
Alright, now the fun really begins! Now that you?re following some folks, you can start browsing what they have pinned. If you see something you like, you can ?repin? it. That means you pin that image to one of your own boards. Alternatively, you can simply ?like? a pin. I would caution you not to repin absolutely everything that catches your eye, or your boards will get out of control quickly. Think about what you?d really want to be able to find later or what you really want your followers to see. To repin, just hover your mouse over the image and the little buttons pop up on the image like this:
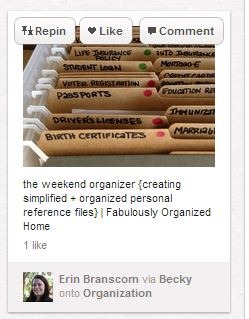
You see that you can either Repin, Like, or leave a comment. Click Repin and this comes up:
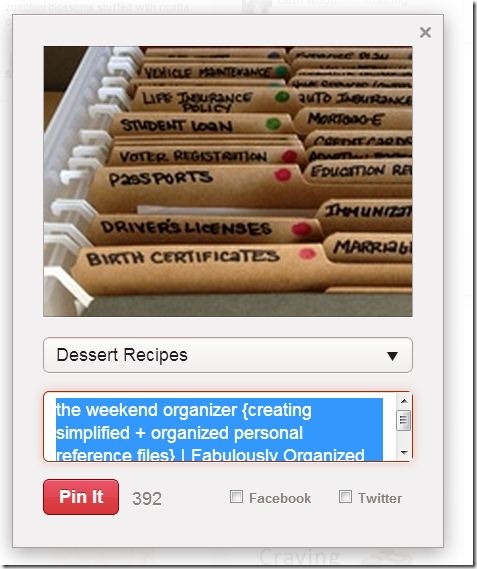
First, you need to choose what board to pin it to. It defaults to the last board you pinned something to (in my case, that?s dessert recipes). Click the arrow to the right of the title to change that. You?ll see a list of all your boards. Click on the want you want or scroll to the bottom, and create a new board right on the spot. (That?s a very handy feature.) Below the board selection is the description of the pin. This will default to whatever the previous person wrote in the description. It?s okay to leave it alone if it describes the pin well, but also feel free to leave your own notes there. It?s a good idea to have words there that really describe the pin. (That will greatly help improve searches.) You see the little ?Facebook? and ?Twitter? checkboxes. Check those if you want your pin to show up on your Facebook wall or to be tweeted. I do not recommend doing this regularly. I only use this feature when there?s a pin I really love. I don?t want all my Facebook friends to keep seeing a bunch of my pins in their newsfeed. Then click the red Pin It button, and you?re done. It takes you right back to where you left off!
If you click on the image it should take you to the website or blog where it was pinned from so you can get more information. Sometimes the links get broken, which is definitely annoying. What good is a picture of great recipe if you can?t get back to the recipe? It?s a wise idea to check to make sure the link works before you re-pin (although I admit to sometimes being lazy about this).
Add a Pin It Button to Your Browser (Step 6)
This is an amazing little tool, and something that some more experienced Pinterest users don?t even know about it. Experienced users, don?t go another day without this. Go to http://about.pinterest.com/goodies/ and scroll down just a bit and click on Install Now.

It will install that little button you see in the picture at the top of your browser. When your on a webpage just click that button to pin an image straight from the source. It?s super quick and easy. If you never pin anything new, all you see is recycled content on Pinterest, so try to remember to pin things around the web.
It?s important to note that there are a few bloggers and sites that don?t want their stuff pinned, but that?s definitely the minority. Most people LOVE to have their stuff pinned. It brings traffic back to their site and makes them feel warm and fuzzy inside that people loved their content enough to pin it. Most who don?t want you pin their content will have it disabled on their site. Also, it?s good etiquette not to rewrite an entire recipe in the description of the pin. You want to direct people back to the original site, not give them everything they need right on Pinterest. Plus, long descriptions are annoying.
Search for Pins or Boards (Step 7)
You can also use Pinterest as a search tool. There a search bar in the upper left corner. Just search for what you?re looking for. I sometimes search for recipes or organizing ideas.
For example, let?s say I want a chocolate cake recipe. I type chocolate cake in the search bar and click. It brings all the pins with ?chocolate cake? somewhere in the description.
However, let?s say I really, really love chocolate cake and I want more chocolate cake ideas to show up when I?m just browsing through Pinterest. In that case, I?d want to search for Chocolate cake boards and follow those boards. To do that just click on boards below the search bar (after the original search). Just click follow to follow the boards.
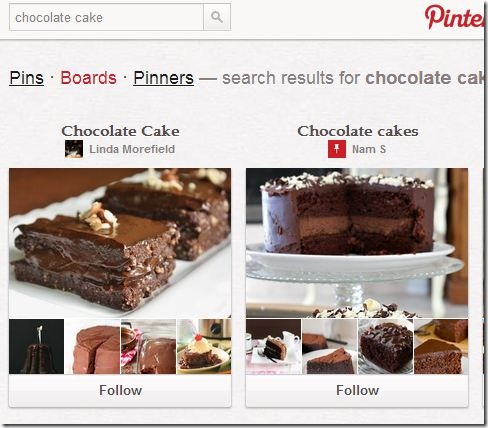
Also, I?ve noticed some things don?t lend themselves to being found easily by searching for a pin and are more likely to found by searching for specific boards. For example, I love online printables and planners. I find a lot more of these by searching for boards including ?Printables? in the title.
Don?t Be Afraid to Unfollow Boards (Step 8)
I regularly unfollow boards that don?t interest me. There?s nothing wrong with that. If you unfollow a board, you?ll still be following all the other boards by that person. Watch the video to see how to do that.
Alright, I hope I?ve inspired some of you to use Pinterest. If you?re a more advanced user, I hope you learned something as well, and stay tuned for next weeks about how to organize your pin boards.
You can see all my boards and follow me on Pinterest by clicking here. Leave a link to your Pinterest in the comments. Also tell us what you like to Pin and how long you?ve been using Pinterest.
Pin ItGoogle+Source: http://confessionsofarecoveringchocoholic.com/2013/02/13/how-to-use-pinterest-for-beginners/
adrienne bailon yelp stock honda classic news channel 5 nashville weather jason varitek andrew breitbart dead
No comments:
Post a Comment